Seasonal Film Preset Guide — Best Settings for Every Season (2026)
Seasonal Film Preset Guide — Best Settings for Every Season (2026)
A film look is not one preset applied the same way year round. It is a consistent color philosophy adjusted for the light that exists in each season. Spring light is cool and unpredictable. Summer light is warm and intense. Autumn light is soft and golden. Winter light is flat, cool, and hard on skin tones.
Apply the same preset without seasonal adjustment and your gallery looks inconsistent — not because the preset is wrong, but because the light changed and the editing did not respond.
This guide gives you the exact adjustments for each season so your film editing stays consistent across the full year.
Why seasons change your film look
Three things change significantly across seasons, and all three affect how film presets render.
Color temperature. Winter light is cool and blue. Summer light is warm and yellow. Autumn light is warm but can turn muddy. Spring light swings between cool shade and warm sun within the same shoot. The same white balance setting produces completely different results in January versus July.
Contrast structure. Summer has harsh highlights and deep shadows. Winter is often flat with low midtone separation. Autumn has soft, forgiving contrast. Spring has gentle contrast but inconsistent skies. Film presets calibrated for one contrast structure will read differently when the ambient contrast is different.
Color dominance. Spring greens return vivid and often neon. Summer greens go yellow, skies go cyan. Autumn oranges and reds dominate. Winter blues and greys can desaturate everything including skin. Each season has a dominant color that can fight against or enhance your preset's color philosophy.
The seasonal workflow foundation
Before the seasonal adjustments, this five-step workflow applies year round. The seasonal tweaks in the sections below happen at step five.
Step 1 — Apply your film preset.
Step 2 — Fix exposure. Brightness comes before color. Get the overall exposure right before touching white balance or color.
Step 3 — Protect highlights. Film quality lives in the highlight roll-off. Pull Highlights -25 to -40 as a minimum on any season. More in summer, less in winter.
Step 4 — Fix white balance. Do not chase perfect neutral — chase believable skin and clean whites. These two are the indicators that white balance is correct.
Step 5 — Apply the seasonal adjustment. This is what the rest of this guide covers.
For the foundational white balance technique: How to Fix White Balance in Lightroom
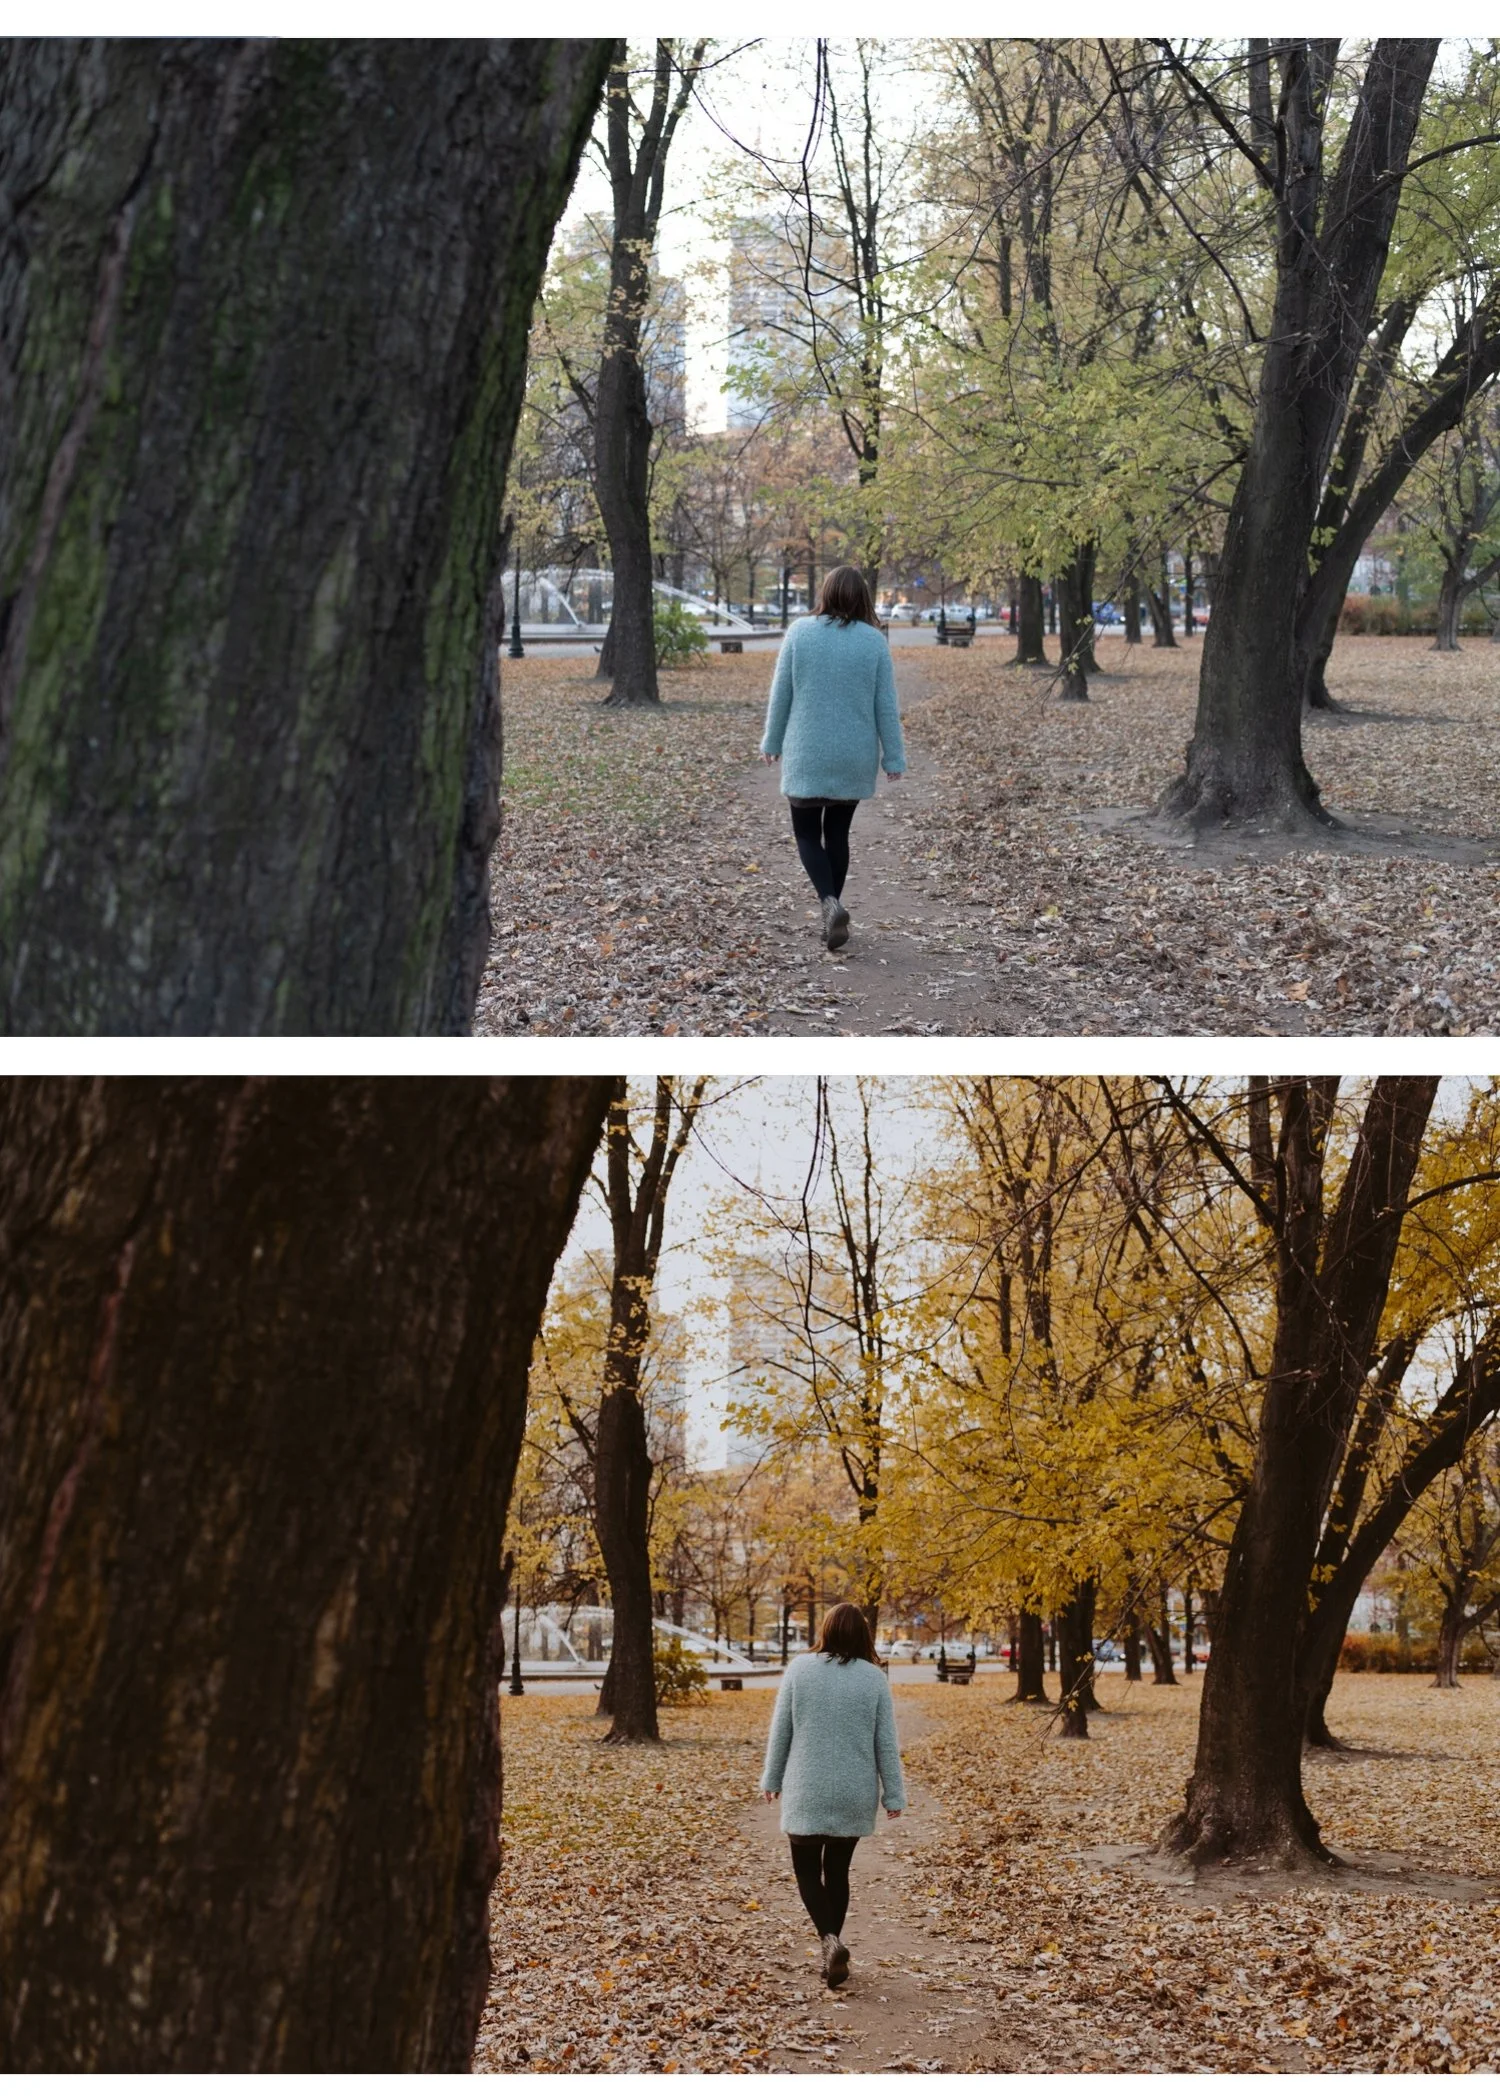
Spring — clean light, fresh greens, unpredictable skies
Spring is the most technically inconsistent season for film editing. The light changes rapidly — from cool overcast morning to warm afternoon sun within hours. Greens return vivid and often neon. Skies alternate between clean blue and complex grey.
The two spring problems that make photos look digital
Neon greens. Spring foliage is at its most vivid and phone cameras push it further. Digital spring green is cyan-shifted and oversaturated — the opposite of organic film green.
Cool blue shadows. Spring shade is often genuinely blue from the cool sky. Without correction, film presets applied in shade produce blue shadows that look sterile and cold.
Spring settings
White balance: Add Temperature +100 to +200 from Auto if the scene feels cool and sterile. Spring shade specifically often needs warming before applying the preset.
Highlights -30 to -40: Spring skies and white blossoms clip quickly. Pull Highlights before anything else.
Green Hue toward yellow: +8 to +12. Shifts neon spring green toward organic film green.
Green Saturation: -15 to -20. Reduces the vivid oversaturation of spring foliage.
Blue Saturation: -8 to -12. If the sky turns cyan, reduce Blue Saturation slightly.
Spring quick rule: If spring looks too digital, fix greens first — not contrast.
For the dedicated spring preset guide: Best Lightroom Presets for Spring
Summer — bright sun, harsh highlights, warmth stacking
Summer is the hardest season to edit cleanly. The light is warm and bright, skin is already warm from sun, and a warm film preset applied without correction creates an orange, oversaturated result. The challenge is getting warmth without orange, brightness without clipping, and vibrancy without vivid.
The three summer problems that make photos look digital
Orange skin from warmth stacking. Summer warmth plus phone camera skin processing plus a warm preset creates very orange skin. This is the most common summer editing problem.
Clipped highlights. Summer sun clips highlights aggressively — sand, white clothing, skin in direct sun, reflective water. Without strong highlight protection, beach and outdoor summer photos lose detail in the brightest areas.
Cyan water and sky. Blue water and sky in summer renders vivid cyan on digital cameras. Film photography had more muted, deeper blues.
Summer settings
Highlights -40 to -55. More aggressive than other seasons. Summer needs maximum highlight protection.
White balance: do not add warmth. Summer is already warm. If the scene feels orange, cool Temperature slightly before applying the preset rather than adding more warmth.
Orange Saturation: 0 to +5 maximum. Keep skin saturation controlled. Summer warmth plus preset warmth creates orange without adding more.
Vibrance: -8 to -12. Summer vibrancy is already high. Film summer is calm and intentional, not vivid.
Aqua Saturation: -10 to -15. For beach and water photography — reduces the cyan quality of digital water rendering.
Blue Saturation: -12 to -18. Deeper, more natural sky blue.
Summer quick rule: Do not add warmth just because it is summer. Summer is already warm — your job is controlling it, not adding more.
For beach photography specifically: How to Edit Beach Photos in Lightroom
For golden hour in summer: How to Get the Golden Hour Look in Lightroom
For the summer preset guide: Best Lightroom Presets for Summer
Autumn — soft contrast, rich tones, easy to over-warm
Autumn is the easiest season to make look beautiful and the easiest season to ruin. The warm golden light suits film presets naturally — but adding preset warmth on top of autumn warmth creates orange overload. Autumn film editing is about restraint.
The three autumn problems that make photos look digital
Orange overload. Warm preset plus autumn warmth plus orange foliage equals skin that looks orange and leaves that look radioactive. The most common autumn editing mistake.
Muddy brown shadows. Autumn shadows pick up the warm ambient color. Without correction, shadows go brown and dirty rather than deep and warm.
Over-saturated reds and oranges. Digital cameras push autumn color toward vivid. Autumn film photography had rich but controlled color — not the neon orange of digital processing.
Autumn settings
White balance: keep warmth controlled. Autumn ambient light is already warm. Reduce Temperature -100 to -200 from Auto before applying if the overall scene looks orange before editing.
Orange Saturation: -5 to -10. Reduce after applying preset. This single adjustment has the most impact on preventing autumn orange overload.
Orange Hue toward red: -5 to -8. Shifts autumn oranges toward a deeper, more burnt quality rather than vivid yellow-orange.
Yellow Hue toward orange: -8 to -12. Deepens autumn yellows toward warm amber.
Contrast: -10 to -15. Autumn light is soft. Let the natural softness exist rather than adding artificial contrast.
Shadow Color Grading: hue 35, saturation 8. Keeps warm depth in shadows without the muddy brown quality of uncorrected autumn shadows.
Autumn quick rule: Autumn film looks best when warmth is present but restrained. If anything looks orange — reduce Orange Saturation before touching anything else.
For the dedicated autumn preset guide: Best Lightroom Presets for Autumn
Winter — cool light, flat scenes, skin tone danger
Winter is the most technically demanding editing season. Scenes are often flat, grey-blue, and lifeless. Skin tones go cool and grey or pink and unnatural. Snow clips to pure white without highlight protection. The challenge is adding life and warmth without making the scene look like it was shot in a different season.
The three winter problems that make photos look digital
Blue-grey shadows everywhere. Winter ambient light is dominated by cool sky tones. Shadows in winter scenes go blue-grey — cold, sterile, and the opposite of the warm shadow quality of film photography.
Flat midtone separation. Winter overcast light compresses tonal range. Without midtone structure, winter photos look flat and undifferentiated.
Skin that loses warmth. Winter light strips skin of the natural warmth that summer and golden hour add automatically. Skin looks grey, pink, or lifeless without specific correction.
Winter settings
Exposure: +0.3 to +0.5. Winter scenes are often genuinely underlit. Lift overall exposure slightly to add life before anything else.
Temperature: +150 to +300. Winter ambient light is cool. Add warmth before applying the preset to give the preset a natural-warm foundation to work on.
Highlights: -20 to -30 for snow scenes. Snow clips quickly. Protect detail in snow before applying.
Whites: -15 to -25 for snow. Keep snow white and detailed, not blown out.
Shadow Color Grading: hue 35, saturation 12. This is the most important winter adjustment. Warm Color Grading in shadows replaces the cool blue ambient shadow quality with the warm shadow toning of film photography. Transforms winter shadow quality immediately.
Orange Luminance: +15 to +20. Winter light strips skin brightness. Orange Luminance restores natural skin tone without adding color.
Contrast: +10 to +15. Winter flat light needs more contrast structure than other seasons. Add gently after exposure is correct.
Winter quick rule: Winter film editing is about clean whites plus believable warm skin. Get those two right and everything else follows.
For the dedicated winter preset guide: Best Lightroom Presets for Winter
For Christmas photography specifically: Best Lightroom Presets for Christmas
Keeping your gallery consistent across seasons
The goal of seasonal adjustment is not to make every season look identical — it is to make every season look like the same photographer made intentional choices about the light.
One preset family, seasonal variations. Use the same preset collection year round. Switch between variations within the collection — a cleaner, cooler variant for winter and spring, a warmer variant for summer and autumn. All within the same color philosophy.
Adjust per group, not per photo. Sort photos by season and by lighting condition within the season. Edit one reference photo per group and batch paste to the rest. The seasonal adjustment applies consistently across the group.
Review across seasons in grid view. Periodically view photos from different seasons together. The editing direction should feel related — clearly from the same photographer — even though the light is different.
The Studio Archive for year-round editing
The Studio Archive contains 130+ presets across every collection — covering the clean, warm, moody, golden, and B&W directions needed for year-round consistent editing. At $0.68 per preset it is the most practical purchase for photographers who want a complete seasonal system without buying multiple packs.
FAQ
Do I need different presets for different seasons?
No — you need one preset family with the seasonal adjustments in this guide. The same A6 or V1 preset with the seasonal tweaks above covers all four seasons. Different preset packs for each season create visual inconsistency across your gallery.
Why does my preset look great in summer but flat in winter?
Winter's flat ambient light and cool color temperature creates a different starting point than summer. Add Temperature +150 to +250 before applying and lift Shadows Color Grading with warm toning. The same preset works in both seasons with these adjustments.
What is the most important seasonal adjustment?
White balance correction before applying the preset. It is different for every season and has more impact on the final result than any HSL or Color Grading adjustment.
How do I stop skin from looking orange in summer and autumn?
Keep Orange Saturation at 0 to +5 maximum after applying any warm preset in warm seasons. The preset adds warmth — the ambient light adds warmth — the phone processing adds warmth. Orange Saturation is the valve that prevents all three from stacking.